Lifetime Fuel Economy: 39.49 mpg

Monday, June 30, 2008

Two aero mods in one day...

I finished the other wheel skirt today, and in response to a 6-2 vote on Ecomodder, I purchased some green Krylon Fusion paint (works on plastic). I used the paint already on my rain barrel, so I knew it was worth the $5 price tag. I got the skirts painted, which seemed to greatly please my neighbors, and although the skirts are a darker "hunter" green, they look great.
I still had time before Linda came home, so I started work on the grill block/air dam. I taped an individual sheet of coroplast in place, measured how long I wanted it, and got to cutting.

I taped all the edges really well with my heavy duty duct tape prior to painting, and I got to use the license plate as a giant washer since I put two screws through the bottom of it near my new (smaller) air intake. I'm going to trim it tomorrow to match the bumper lines, remove it, re-tape the top, and re-paint it. I'm really pleased with the outcome.
Before:

After:

Whole picture:

$2.50 Wheel Skirts!

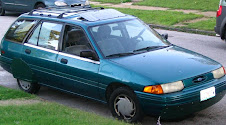
I set out today to begin streamlining the car. In an effort to satisfy my requirements of the car and its modifications paying themselves off, and because I'm known for my frugal nature, I'm using super low-cost materials. Here's the car's profile I started with:
No, I'm not campaigning for Hayes. That's a corrugated plastic sign (coroplast) that I picked up for free after the election. (I got 100 of them) I also needed some support structure that was cheap and lightweight. Luckily, I found something to fit this need in my basement, left by the previous owner; sheetrock (drywall) corner - reinforcing metal braces. (I don't know what they're really called) Here are my assembled tools; drill, 1/4" nut driver bit, 3/32" drill bit, measuring tape, duct tape (bought the highest quality type), self-tapping sheet metal screws, large washers, tin snips, pliers, and a comfy seat. The sheetrock corner-thing is the piece of metal there. I folded it flat (usually it is at 90 degrees).
I decided to run one brace across the wheel well and one at the bottom, attached to the sign. Here's the first brace. I attached it to the inside of the door opening with a sheet metal screw and to the back bumper with a spare interior trim screw.

I then taped two signs together, enough to cover the opening, , set it inside the folded sheetrock brace, taped the bottom up (coroplast is hollow and open at the ends)and ran 4 sheet metal screws through it to lock it in place. It felt pretty rigid after this. Here's what I mean by, "inside the folded brace":

I also cut the pointy heads off the sheet metal screws that would be pointing in toward the tire with my dremel.
Next, I bent the bottom brace out so that the coroplast would clear the wheel, and screwed the front side of the brace into the door opening, and the back into the rear bumper. I used my knife to cut the shape of the skirt, which took some trial and error, but luckily I cut off small pieces each time and all was not lost. After getting a good fit (especially around the rear door), I removed the skirt and taped all the edges to seal them and for support when screws and washers hold it in place. After re-installing the bottom brace screws, I used 10 sheet metal screws and washers around the edge to affix it to the car. You wouldn't want to do this to a nice car, but for my purposes, it should work great. I taped the leading edge into the door opening to ensure smooth airflow outside the wheel well, and the door shuts well, clearing the skirt.
I think I will add a little "class" to this mod and paint the coroplast, so they will end up costing about $5 in materials each. I'm going to either do white with my "ecomodder.com" decals on them to help them stand out, or green to match the car. I'll be running a poll on the ecomodder forums to decide for me.

Friday, June 20, 2008

Highway Mileage

I made a trip to my friends' house yesterday and did about 85% highway driving with the air off, windows up, on my +5 psi tires. The 15% city miles I was very careful to EOC (engine off coast) as much as possible. It's getting very easy to predict when to shut off, by the way...
45.5 mpg may be a little inflated due to pump error, but it's indicative of some significant gains from my first tries at control tests. I'm going to run the next tank all the way down because I'm going to run some fuel system cleaner through at 5 gallons and then change the fuel filter. If things go right, and my aero mods (soon) are effective, I could break into the 500 mile/tank club next school year on my commute!

Sunday, June 15, 2008

City Mileage with Hypermiling

I've started doing modifications to my driving and the car; I decided it's best to do/build things now when I have time rather than reasons to drive, and then this fall do A-B-A tests and the like when I have a routine trip to make every day (to school) in order to get good data for this blog. This week, I'm going to start making aero mods and making them so that they can be undone for testing.

For my latest run, I hypermiled on 37 psi tires, and did 100% city driving with lots of stop lights and signs. I only used the a/c for about 5-10 miles, and the Gascort came up with 31.35 mpg. Not scientific data, but a good indication of what's in store for this fall!

Thursday, June 12, 2008

Tire Pressure - Rolling Resistance relationship

Well, I went out with my new bike pump today to test out the effect of tire pressure on rolling resistance. Tire pressure for the first test was 32 psi, and for the second test, it was 37 psi. I used a big spring scale for measuring grain that I inherited from my grandpa, a Kansas farmer.
Either time, the force required to get the car to move was 58 pounds. I know flat tires make a car harder to push (enough to feel the difference), and I also know the top end should be less dramatic. I'm anxious to try pressure out when I'm back to making repeated trips to and from school every day, since there was no effect here.
Maybe there's another way to test this...

Wednesday, June 11, 2008

A surprise... better than expected!

This run was about 80% highway, more than before(50/50), but about 85% of it was with the air conditioning running, compared with 30% before. I'm very impressed and happy about the 34.5 mpg, but also worried about the large variance between the two "tanks" I've run so far, for the purpose of this experimentation. I knew this car's FE would react to little things easily,though - that's why I bought it. My Mustang never got lower than about 18 mpg when I ran the heck out of it, and never over 21 when I babied it. I think a little more time at factory settings might do me good, but I'm anxious to further my mods. I knew if worse came to worse, I could restart data collection next fall when I have a very regular and dependable commute to and from school, and do weekly trials with each mod separately. That will have to do, because Linda isn't going to let me turn the air off on her now!
For now, I'm going to bump tire pressure. I wanted to start hypermiling, but while I'm driving around a very pregnant wife, I don't want to do anything too oddball. The sidewall max on the tires is 35 psi; I'm going to set them at 37 - a nice, even 5 psi above factory settings. I think I'll work on calculating rolling resistance tomorrow.

A non- FE mod

In preparation for our baby (Linda's due July 1oth), I installed the car seat base today in the Gascort. I had trouble at first, because I couldn't get the base tight without having it tilt too far to the rear. I then decided to remove the seat back to see if it was advantageous to place the base farther toward the back of the seat cushion. Once the seat back was off, I got side-tracked and decided to install a LATCH bar like newer (2003+ model year) cars have.
Now I have the seat installed via the LATCH and the traditional seat belt. My baby's seat is not going to budge from that position.